Tuesday, January 29, 2013

Swatch Tuesday! Disturbed Polish


This post is a little smaller than I originally intended but only because I was busy all weekend GETTING AN APARTMENT!!  I’m officially a big girl that will be on my own starting February 23!!  Wheeeee!  So, I would like to apologize in advance for short posts and lack of nail art.  I will be busy on the  (when I usually do my nails) for the next month as I acquire furniture and other necessities for my new place. Please just bear with me as I get everything squared away.  I’m sure I will be doing much more nail art and swatching once I’m all moved in.  Won’t be able to do much else, cuz I’ll be broke as a joke! ;P

Okayyyy, on to the polish!  I have posted about Disturbed Polish before in this post*.  My collection has increased to seven DP polishes!  I wanted to swatch all of them, but like I said, I wasn’t able to.  Today I have Department Store Christmas, Dirty Little Bitch, and Dirty Panties.  I just love all of Annette’s scandalous names for her polishes!  Others in my collection (that I’ll eventually get to) include Strawberry Short-CAKE, Walk of Shame and Blow (that I posted to IG for my birthday mani).  Others that I hope to add to my collection soon are Smurf Jizz, All You Need to Suck-Seed, STD, and Hooker Heels

Disturbed Polish Department Store Christmas
I don’t usually like the holiday themed polishes, because you can only wear them for that specific holiday. Or at least that’s how I feel.  I went against my gut with this one though.  It’s Christmas-y without being overly Christmas-y, if that makes sense?  Yes, it’s green, red, and silver, but the base has a slight teal/blue tint to it that I think would layer nicely over some other blue or green polishes. 


I layered two thin coats of Department Store Christmas over one coat of O.P.I. Don’t Mess With OPIDepartment Store Christmas has a teal/green shimmery jelly base with different sizes of red and green hex and square glitters and some yummy sliver holo hex and micro holo glitters.  This isn’t available in her shop anymore [??], so sorry for the tease! :X

Disturbed Polish Dirty Panties
Dirty Panties has a sheer light hot pink jelly base with TONS of glitter.  There are white and pink shred glitters and micro iridescent clear glitters.  I layered two thin coats over one coat Sinful Colors Easy Going


Disturbed Polish Dirty Little Bitch
Ermahgerd!  I loveeeee this polish!  It’s a neon pink base with black and white shred glitter and small black square glitter.  This is two coats of Dirty Little Bitch with no undies (lol).  I love how neon this polish is.  Just gorgeous.  And it dried really fast too!


*Annette informed me she has switched the company she purchases her bases from, so no more smelly polish!  Although Cat Box and Dirty Panties are the only ones I have with that particular base.

You can find these wonderful polishes online in the Disturbing Behavior store for $7.00 for full sized bottles.  I talked about it before, and I’m gonna talk about it again: while you’re browsing the store, you BETTER add some of that whipped cuticle oil to your cart!  (or any of those creams)  I tried the Hempseed Cuticle Oil as well as the new Lemon Jazz Body Butter….you will NOT be sorry!  Annette hand-makes them all with her family recipes!  How amazing?!

*-*-*-*-*
Follow me on IG @nauti_mermaid
Follow me on Pinterest

Friday, January 25, 2013

Pink Grapefruit Margarita and Pink Flower Mani


Hello Loves!  After last night's IG contest drama, this drink is welcome!  Also have a cute pink flower dot mani to go with it.  Girrrrlin' it up for ya ;)
To make a Pink Grapefruit Margarita
You’ll Need:
1 cup Ruby Red Grapefruit Juice
½ cup Lime Juice (about 4 limes if you want fresh)
1 cup Triple Sec or Orange Liqueur
1 cup Silver Tequila
3 cups Ice (if you’re making the frozen version)
Kosher Salt/Sugar (optional for rim)

Make It!
I’ve never been a fan of the frozen margarita.  I’m convinced they put less alcohol in there.  AND, if you’ve ever watched the bartender make them, they leave a quarter of the stuff in the blender!  Rip off!  So anyways, I make mine on the rocks.  This is clearly enough for two or three people.  I highly doubt anyone can drink a cup’s worth of tequila at once…and still keep it together.  Combine all ingredients in a pitcher of some sort.  Rim the glass with salt if desired.  I would make a mix of sugar and salt; personally I think grapefruit juice is really sour and it seeds some sweetness.  Mix and pour into glasses.  Add ice to cup as needed.  DON’T add it to the pitcher, the ice will melt and the drink will get watered down.  If you’re making the frozen version, combine all ingredients in a blender and blend.  Pour into glasses and enjoy!
photo & recipe found on Pinterest; however, the link
contained a virus, so I will not post here.
Pink Flower Mani
Essie French Affair dotted with Sinful Colors 24/7
Essie Watermelon; Accent nail Essie Watermelon topped
with Varnish Vixen Junior Prom
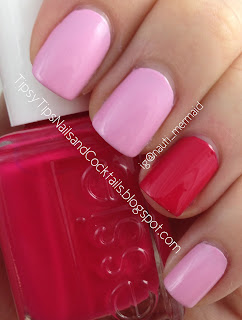
I’m slowly ramping up to attempt the vintage rose nail art.  I’ve been DYING to try it foreverrrrrr, but I’m afraid I’ll screw it up.  I tried the cute little dot-flower technique.  I’m just kinda ehh about it.  I used EssieFrench Affair as the base and Watermelon on the accent.  
Two coats Essie French Affair and Watermelon
Two coats Essie French Affair and Watermelon

I topped Watermelon with Varnish Vixen Junior Prom.  It's a clear base packed with different sized and color hex glitters.  Ya got matte pink, black, and sliver holo.  The flowers are Sinful Colors 24/7 and Essie Watermelon. I used my dotting tools to make four dots, then after they were dry, I dotted the center. 
Essie French Affair dotted with Sinful Colors 24/7 
Essie Watermelon; Accent nail Essie Watermelon topped
with Varnish Vixen Junior Prom
You can find Varnish Vixen’s polish in her Etsy Shop; $8.50 for full sized bottles.  I bought my Essies from Target.

*-*-*-*-*
Follow me on IG @nauti_mermaid
Follow me on Pinterest for my nails, drinks & randomness

Tuesday, January 22, 2013

Swatch Tuesday! Comparison Post

Hello lovelies!  Today I have six swatches for you...all blue!!  I knew I had a few similar colors so I thought I'd compare them.
Essie Butler Please v. Sally Hansen Pacific Blue
Essie Butler Please
I have used this color before, but not on its own (used in this post as undies for Wicked Polish Priapism).  Application was just a little streaky, so I used two coats.  I really love this color!  It's a little less vivid in real life, but it's pretty dang close to this.
Two coats Essie Butler Please
Sally Hansen Pacific Blue
I had seen girls on IG posting how great and perfect this color was.  I would always think it was Essie, but then read the caption and found it was Sally Hansen.  I will say, as much as I LOOOOVE Essie, I think Sally has a better formula.  I only needed one coat, but did two to keep it consistent with Essie's swatch.
Two coats Sally Hansen Pacific Blue
Can you tell the difference?? Here's some bottle shots.
Still can't tell?  Here is Essie Butler Please on my pointer and ring finger.  Sally Hansen Pacific Blue on my middle and pinky.
Two coats Essie Butler Please on pointer and ring;
Two coats Sally Hansen Pacific Blue on middle and pinky
Now can you see?  The Essie is just a fraction of a shade darker.  These are both pretty glossy.  I didn't use a topcoat on either.  

I bought Essie at Target and SH at CVS.

Essie Bobbing for Baubles v. China Glaze First Mate
Essie Bobbing for Baubles
I used this Essie for my birthday mani that I posted on IG.  It's a dark smoky navy blue with just a hint of dark green.  I thought it was perfect with one coat until I cropped the picture and it zoomed in.  There's a little bald spot on my pointer.  Meh.
One coat Essie Bobbing for Baubles
China Glaze First Mate
Sorry, I know I just posted a swatch of this last Tuesday, but oh wellzies.  Quick summary, it's a one coat wonder with great application.
One coat China Glaze First Mate
These obviously have differences when on, but the bottles look pretty close.

Here is Essie Bobbing for Baubles on my pointer and ring; China Glaze First Mate on middle and pinky; no tops.
One coat Essie Bobbing for Baubles on pointer and ring;
One coat China Glaze First Mate on middle and pinky
I bought Essie at Target (the ONLY time I'd seen it in any store - it was the last one) and China Glaze at Sally Beauty Supply.

Essie Dive Bar v. O.P.I. Unfor-Greta-Bly Blue
Essie Dive Bar
There is so much to this color that doesn't show in pictures!  It's a dark black brown jelly with blue, green and purple shifting shimmer.  I used two coats for full coverage.
Two coats Essie Dive Bar
O.P.I. Unfor-Greta-Bly Blue
I love this!  So gorgeous!  It's a sheer blue polish with blue shimmer.  Semi-streaky.  Two coats are perfect.
Two coats O.P.I. Unfor-Greta-Bly Blue
The bottle shots look much more similar than when the polish is actually on.
Here is Essie Dive Bar on my pointer and ring; O.P.I. Unfor-Greta-Bly Blue on middle and point; no tops again.
One coat Essie Dive Bar on pointer and ring;
One coat O.P.I. Unfor-Greta-Bly Blue on middle and pinky
I got Essie at Wal-Mart and O.P.I. at Ulta.

Hope y'all liked my comparisons!  

I think I'm going to stop doing my Wasted Wednesday posts =\ I always end up forgetting to do it then have to rush at the last second.  

*-*-*-*-*
Follow me on IG @nauti_mermaid
Follow me on Pinterest

Sunday, January 20, 2013

Quickie One Color Gradient Tutorial

Hi lovelies!  I had a lot of positive feedback about my last mani (the successful one lol), so I wanted to show my technique.

First, gather all your supplies:
Polish Remover
Base Color (Sinful Colors Snow Me White)
Makeup Sponges
Gradient Color(s) (China Glaze A Rose Among Thorns [pink/red] & Sun Worshiper [yellow/orange])
Cleanup Supplies (Orange Sticks, Brushes, & Polish Remover Pen)

Step 1 Paint your nails a base color.  Let it dry completely.  I didn't let my pointer dry, and the base came off on the sponge.  No bueno :(
Step 2 Paint the base color and gradient color onto the makeup sponge.  Paint the base color at the top of the sponge and the gradient color under it.  
Step 3 Dab the sponge onto your nail.  Dab in slightly different places to blend the colors on your nail. 
Then clean up using your tools.  Putting tape around your nail works great, but I am currently out of tape, so you get to see the mess!
Step 4 Paint the gradient color on the bottom of the makeup sponge.  Dab on the very tip of your nail.  This way, the color will be darkest there.

Repeat Step 3 to get rid of the harsh line.
Step 5 Clean and seal with a topcoat.

Friday, January 18, 2013

Hibiscus Martini and Gradient Mani Fail/Redemption

Hello lovelies!  Happy Friday :)  Sorry I completely forgot about my Wasted Wednesday post.  I stayed home sick on Tuesday and got sucked in to watching the whole first season of American Horror Story. Anyways, I have a GREAT drink recipe (similar to last weeks) and some nail fail/redemption pics.

To make a Hibiscus Pom Martini,
You’ll Need:
Absolut Hibiskus
Stirrings Pomegranate Mixer
Stirrings Pomegranate Sugar
Ice

Make It!
Rim a glass with the sugar.  Combine one shot vodka with two shots mixer.  Shake in a glass with ice. Strain into sugar rimmed glass.

This tastes JUST like a Passion Tea Lemonade from Starbucks.  LOVE it!  And the vodka bottle is pretty; so that’s a plus.

Gradient Nail FAIL and Redemption
I started out with this great idea in my head.  I was going to attempt a gradient that looked like a sunset.  I started with China Glaze Peachy Keen as the base.  Gorgeous right?!  Well, that was the prettiest it’s gonna get.  lol
Two coats China Glaze Peachy Keen
China Glaze Peachy Keen, Escaping Reality
and Japanese Koi (neon)
I tried to do the gradient with ChG Escaping Reality (pink) and Japanese Koi (neon) (orange).  Ehhhh it didn’t look as good as I envisioned it.  I would have suffered through it, but I was out from work one day so I decided to attempt again.
Julep Eileen and
China Glaze Yellow Polka Dot Bikini
Julep Eileen and
China Glaze Yellow Polka Dot Bikini
This one was MUCH better.  I only used one color (ChG Yellow Polka Dot Bikini) over Julep Eileen.  It’s really hard for me to explain if you don’t know the method for gradients.  I am hoping to do a tutorial one of these days.  Not like I’m an expert, obviously, but the way I did it worked for me.  In a nutshell, follow these steps:
Paint your nails a base color (Julep Eileen) and let it dry completely.
On a makeup sponge, apply the base color and the gradient color.
Dab the sponge on the nail.  Be sure to dab the sponge in different areas of the nail, in order to blend the colors (so you don’t get such a harsh color line like my first attempt).
Turn the sponge over and paint some of the gradient color (ChG Yellow Polka Dot Bikini) onto it. 
Dab this on the very tip of the nail to give full color coverage.
Flip the sponge back over to blend once more.
Let dry briefly.  Seal with a topcoat to smooth sponge marks.

Like I said, it’s a little hard to explain without step-by-step. I will try to do one ASAP. 
I’ve only attempted gradients probably about three times.  This is the best I’ve done and I’m very proud of these babies :D

*-*-*-*-*
Follow me on IG @Nauti_Mermaid
Follow me on Pinterest
Tuesday, January 15, 2013

Swatch Tuesday! Free For All


Hello Lovelies!  This Swatch Tuesday is definitely a free for all.  I have a crazy insane number of untrieds, so I am going to attempt to do at least five swatches per post until I get that number down considerably.  Yikes!  Next time, I’ll stick with a color theme or something, because this is all over the place lol :P

China Glaze First Mate and Sally Hansen Mermaid’s Tale
This China Glaze is great!  I think I like the brand now.  They’ve sufficiently redeemed themselves after that crappy experience I had with my first bottle of For Audrey.  First Mate is a deep navy blue crème polish that was perfect with one coat. 
One coat China Glaze First Mate
Sally Hansen Mermaid’s Tale is just gorgeous!  AND it’s a complete dupe for Deborah Lippman’s Across the Universe.  It’s a dark blue jelly base with micro blue hex glitter and medium green and blue hex glitters.  It was good with one coat, but of course, mo glittah is mo betta, so I did two :)
Two coats Sally Hansen Mermaid's Tale
over one coat China Glaze First Mate
Two coats Sally Hansen Mermaid's Tale
over one coat China Glaze First Mate
I bought First Mate at Sally Beauty Supply and Mermaid’s Tale at Target. 

L’Oreal Crazy for Chic
Crazy for Chic is a gorgeous dark pink crème polish.  WOW!  Not blue! Haha I had to force myself to pick some other colors ;)  I was kinda ehh about the L’Oreal polish before, but I totally love this!  It’s really girly and beautiful.  This is two thin coats.  I had no application issues. 
Two coats L'Oreal Crazy for Chic
Two coats L'Oreal Crazy for Chic
I also bought Crazy for Chic at Target.

Disturbed Polish CatBox (I renamed mine caTTTbox; if you follow me on instagram, you know why)
Ohhh my lordies!  What a glitter packed bottle of awesomesauceness!  CatBox has a clear base packed with iridescent little glitters and tons of black shreds.  I layered two thin coats over one coat of Essie Boxer Shorts.  No application issues, the only thing about this is the smell.  I'd definitely do your nails outside if you use it.  I’m exiled to the garage or patio when I paint my nails anyways, so it wasn’t a problem for me. 
Two coats Disturbed Polish CatBox
over one coat Essie Boxer Shorts
Two coats Disturbed Polish CatBox
over one coat Essie Boxer Shorts
Two coats Disturbed Polish CatBox
over one coat Essie Boxer Shorts
You can find Disturbed Polish online in the Disturbing Behavior store.  $6.75 for a full sized bottle (price will be increasing to $7.00 on February 1st, but that’s still on the cheap end for indies.  The polish really is great quality, so it’s worth it!).  I also highly recommend purchasing some cuticle oil while you’re there.  Amazing stuff!  I have a teensy little container of the whipped vanilla that Annette graciously sent me.  They are $3.50 in her shop.  It really is awesome!  Smells so great and is so soft and creamy!  I use it about three times a week at night (because I always forget to put my moisturizing gloves on at bedtime), but I can really tell a difference in my cuticles. 

Liquid Glam Lacquer Hollywood
Look!  More pink!! Haha.  Hollywood has a sheer pink jelly base with just a hint of small gold and orange glitter.  I quickly swatched one coat so you can see how sheer it is. 
One coat Liquid Glam Lacquer Hollywood
no undies
I had no application issues and it dried pretty quick.  I layered two thin coats over one coat of Essie Mod Square
Two coats Liquid Glam Lacquer Hollywood
over Essie Mod Square
Two coats Liquid Glam Lacquer Hollywood
over Essie Mod Square
Check out Liquid Glam Lacquer’s Etsy Shop.  Full sized bottles go for $8.25.

Varnish Vixen Out of Touch
Had to end it with a blue! This polish has been calling me to try it out for a while.  What a gorgeous color!  Seriously.  Out of Touch has a sheer shimmery blue base with small and medium gold hex glitters.  Again I quickly swatched one coat alone so you can see how it looks.
One coat Varnish Vixen Out of Touch
no undies
Application was great, I didn’t have to fish to get any glitters.  This is one coat Out of Touch over one coat Sinful Colors Aquamarine (at least I think that's the name, I'd look, but my whole polish stash is currently in a box, and I am NOT looking through that thing right now!!). 
Two coats Varnish Vixen Out of Touch
over one coat Sinful Colors Aquamarine
Two coats Varnish Vixen Out of Touch
over one coat Sinful Colors Aquamarine
Two coats Varnish Vixen Out of Touch
over one coat Sinful Colors Aquamarine
Visit Varnish Vixen’s Etsy Shop where full sized bottles sell for $8.50.  Both times I’ve ordered from this shop, I’ve received a free mini bottle with my order.  Love that little surprise :)

Okayyy!  Did you stick with me through all that?  I promise I’ll stick with a theme next time.  Like all one brand, or color, or something.  I just went bottle crazy and grabbed whatever looked pretty.  ;)

Notice anything about my pics??  I hope you do!  They're like 24695894750289 million times better because I got a REAL light box from Amazon!  Chicka-chicka-yeahhh *McLovin’ Voice* lol this thing is amazeballz!  No more crappy ass pics from my sorry attempt at a DIY light box!  :D