Showing posts with label manicure. Show all posts

Monday, April 8, 2013

Nail Art! Nauti[cal] Nails & Autism Awareness Mani

GUYS! I suck at consistently posting!  Sorry!  I just typed my little heart out reviewing all five of the Summer Cocktails polishes from Stardust Polish for tomorrow's post.

So, enjoy these because I can't type any more and I slacked on my Friday nail art post.
Nauti[cal] Nails
Colors used: Revlon Royal, dotted with Color Club Cherubic; Essie Good as Gold topped with Milani Jewel FX Gold; and China Glaze Hey Sailor, dotted with Sinful Colors Snow Me White.


Annnd my Autism Awareness mani...
Colors used: Stardust Polish Blue Lagoon topped with Different Dimension Light It Up Blue.

*-*-*-*-*
Follow me on Pinterest & IG @nauti_mermiad 

Friday, January 25, 2013

Pink Grapefruit Margarita and Pink Flower Mani


Hello Loves!  After last night's IG contest drama, this drink is welcome!  Also have a cute pink flower dot mani to go with it.  Girrrrlin' it up for ya ;)
To make a Pink Grapefruit Margarita
You’ll Need:
1 cup Ruby Red Grapefruit Juice
½ cup Lime Juice (about 4 limes if you want fresh)
1 cup Triple Sec or Orange Liqueur
1 cup Silver Tequila
3 cups Ice (if you’re making the frozen version)
Kosher Salt/Sugar (optional for rim)

Make It!
I’ve never been a fan of the frozen margarita.  I’m convinced they put less alcohol in there.  AND, if you’ve ever watched the bartender make them, they leave a quarter of the stuff in the blender!  Rip off!  So anyways, I make mine on the rocks.  This is clearly enough for two or three people.  I highly doubt anyone can drink a cup’s worth of tequila at once…and still keep it together.  Combine all ingredients in a pitcher of some sort.  Rim the glass with salt if desired.  I would make a mix of sugar and salt; personally I think grapefruit juice is really sour and it seeds some sweetness.  Mix and pour into glasses.  Add ice to cup as needed.  DON’T add it to the pitcher, the ice will melt and the drink will get watered down.  If you’re making the frozen version, combine all ingredients in a blender and blend.  Pour into glasses and enjoy!
photo & recipe found on Pinterest; however, the link
contained a virus, so I will not post here.
Pink Flower Mani
Essie French Affair dotted with Sinful Colors 24/7
Essie Watermelon; Accent nail Essie Watermelon topped
with Varnish Vixen Junior Prom
I’m slowly ramping up to attempt the vintage rose nail art.  I’ve been DYING to try it foreverrrrrr, but I’m afraid I’ll screw it up.  I tried the cute little dot-flower technique.  I’m just kinda ehh about it.  I used EssieFrench Affair as the base and Watermelon on the accent.  
Two coats Essie French Affair and Watermelon
Two coats Essie French Affair and Watermelon

I topped Watermelon with Varnish Vixen Junior Prom.  It's a clear base packed with different sized and color hex glitters.  Ya got matte pink, black, and sliver holo.  The flowers are Sinful Colors 24/7 and Essie Watermelon. I used my dotting tools to make four dots, then after they were dry, I dotted the center. 
Essie French Affair dotted with Sinful Colors 24/7 
Essie Watermelon; Accent nail Essie Watermelon topped
with Varnish Vixen Junior Prom
You can find Varnish Vixen’s polish in her Etsy Shop; $8.50 for full sized bottles.  I bought my Essies from Target.

*-*-*-*-*
Follow me on IG @nauti_mermaid
Follow me on Pinterest for my nails, drinks & randomness

Friday, January 18, 2013

Hibiscus Martini and Gradient Mani Fail/Redemption

Hello lovelies!  Happy Friday :)  Sorry I completely forgot about my Wasted Wednesday post.  I stayed home sick on Tuesday and got sucked in to watching the whole first season of American Horror Story. Anyways, I have a GREAT drink recipe (similar to last weeks) and some nail fail/redemption pics.

To make a Hibiscus Pom Martini,
You’ll Need:
Absolut Hibiskus
Stirrings Pomegranate Mixer
Stirrings Pomegranate Sugar
Ice

Make It!
Rim a glass with the sugar.  Combine one shot vodka with two shots mixer.  Shake in a glass with ice. Strain into sugar rimmed glass.

This tastes JUST like a Passion Tea Lemonade from Starbucks.  LOVE it!  And the vodka bottle is pretty; so that’s a plus.

Gradient Nail FAIL and Redemption
I started out with this great idea in my head.  I was going to attempt a gradient that looked like a sunset.  I started with China Glaze Peachy Keen as the base.  Gorgeous right?!  Well, that was the prettiest it’s gonna get.  lol
Two coats China Glaze Peachy Keen
China Glaze Peachy Keen, Escaping Reality
and Japanese Koi (neon)
I tried to do the gradient with ChG Escaping Reality (pink) and Japanese Koi (neon) (orange).  Ehhhh it didn’t look as good as I envisioned it.  I would have suffered through it, but I was out from work one day so I decided to attempt again.
Julep Eileen and
China Glaze Yellow Polka Dot Bikini
Julep Eileen and
China Glaze Yellow Polka Dot Bikini
This one was MUCH better.  I only used one color (ChG Yellow Polka Dot Bikini) over Julep Eileen.  It’s really hard for me to explain if you don’t know the method for gradients.  I am hoping to do a tutorial one of these days.  Not like I’m an expert, obviously, but the way I did it worked for me.  In a nutshell, follow these steps:
Paint your nails a base color (Julep Eileen) and let it dry completely.
On a makeup sponge, apply the base color and the gradient color.
Dab the sponge on the nail.  Be sure to dab the sponge in different areas of the nail, in order to blend the colors (so you don’t get such a harsh color line like my first attempt).
Turn the sponge over and paint some of the gradient color (ChG Yellow Polka Dot Bikini) onto it. 
Dab this on the very tip of the nail to give full color coverage.
Flip the sponge back over to blend once more.
Let dry briefly.  Seal with a topcoat to smooth sponge marks.

Like I said, it’s a little hard to explain without step-by-step. I will try to do one ASAP. 
I’ve only attempted gradients probably about three times.  This is the best I’ve done and I’m very proud of these babies :D

*-*-*-*-*
Follow me on IG @Nauti_Mermaid
Follow me on Pinterest

Tuesday, October 30, 2012

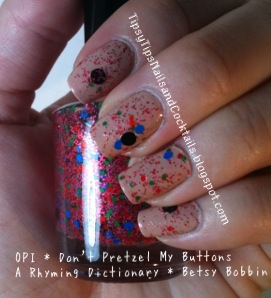
Swatch Tuesday! A Rhyming Dictionary * Betsy Bobbin

So, I know the popular hashtag on IG is #SwatchSunday, but I figured I’d spread my posts out more than just on the weekends.  For my first swatch, I have A Rhyming Dictionary’s Betsy Bobbin

This stuff is so cute!  What really caught my eye were the big black circle glitters in it.  Besides those, Betsy Bobbin is packed with (all matte) micro light and dark pink square, medium orange and green hex, and larger blue hex glitters in a clear base.  LOVE!  I swatched it over O.P.I’s Don’t Pretzel My Buttons.  I wanted to do a nude color for undies to show off the prettiness of all the colors in the polish. 

I had a little problem getting the black circle glitters to come out on the brush.  After each nail, I had to shake up the bottle to try to catch some.  It’s surprisingly runny for the amount of glitter in there.  I used two coats of ARD’s polish over one coat of O.P.I.  Betsy Bobbin has a LONG drying time.  Yes, I am impatient, but even with my drying drops they were still getting smudged/wrinkly after an hour. :(  Definitely a positive; it wasn’t sandy/gritty like most indies with the micro glitter.

I bought Betsy Bobbin from A Rhyming Dictionary’s Etsy shop ($7.50 for a full sized bottle, + shipping).  Make sure to like them on Facebook too! 


(sorry this lighting is SO horrible - I'm in the process of making a real light box)

Friday, September 21, 2012

Cake Jell-O Shots and Chaos & Crocodiles “Underwater Treasure”


Woohoo another week almost over!  I’ve got a cake vodka Jell-O shot recipe and an awesome indie polish to show y’all.

Now, I didn’t actually make these Jell-O shots, because, like most people, I have had prior terrible experiences with them.  **Flashback to Peanut Island on the boat taking about six Jell-O shots then drinking anything I could get my hands on in the span of about 30 minutes.  Those things hit like a ton of bricks…it was a very long day and night, we’ll just leave it at that.**  Anywho, my IG friend Brianna texts me during the Alabama college football games and tells me to take shots with her every time Alabama gets a TD (since I usually can’t get the game on my TV).  Well, the first time, plain shots didn’t get her hammerfied enough, so she asked me to post a Jell-O shot recipe made with cake vodka.  I went to Pinterest and this is the simplest recipe I came across.  The link to the blog where I got the recipe can be found here, or I just copied and pasted for you below.

You’ll Need:
2/3 cup cream soda
2/3 cup cranberry juice cocktail
1 tbsp heavy cream
2 envelopes plain gelatin*
2/3 cup cake-flavored vodka
Few drops food coloring, if desired
Whipped cream - fresh or store-bought
Sprinkles for garnish

Make It!
Lightly spray the mold with non-stick spray and wipe excess off with a paper towel.  Don't overdo it or the residue will affect the taste of the Jell-O.**  Pour the soda, juice, and cream into a medium saucepan and sprinkle the gelatin on top. Allow the gelatin to soak for 2-3 minutes, then begin to heat on low, stirring constantly until gelatin is fully dissolved (about 5 minutes).  Remove saucepan from heat and add vodka and food coloring.  Pour into molds and chill for several hours, or until set.  Remove from mold, top with whipped cream, and enjoy responsibly!

*The original recipe suggests 2-3 envelopes, depending on how long your Jell-O shots will be left out (more gelatin for more time).

**Her instructions call for those silicone molds that look like cupcakes.  You can use whatever you normally do for Jell-O shots, they just won’t be as cute as her pictures.

Lovely Miss B used only vodka as her liquid and some food coloring.  We strongly advise against this.  In her words:“Very important note to self: use another liquid besides JUST vodka next time.  Jell-O shots should NOT require a chaser”

Brianna's Cake Vodka Jell-O Shots
It's so cute!

Chaos & Crocodlies Underwater Treasure over Revlon Royal
AHH!  This!!  There is so much to look at in this polish!  Little dark and light blue, green, teal, orange and red hex glitter, smaller light blue square, and of course the big round gold meant to look like treasure!  You see something different every time you look at it.  I thought Revlon Royal was a good base color ("undies").  I used two coats of undies and two coats of Underwater Treasure, then two coats of clear - so.much.dry.timeeeee!!  Even with my drying drops.  But I'm the dummy that didn't let each coat dry in between.  I could have gotten away with one coat of the glitter, but as we all know, more glitter = better!! So I slapped a second coat on.  I had no application issues.  It was a little gritty feeling, so that's why I put two coats of clear on, but after that it was nearly perfect.  

This polish was $10.50 a bottle - YIKESSS!  But again, totally worth the money.  Other full size bottles go for $9.75 and minis $4.75.


Awesomesauceballz!  Love love love!  I also ordered Haunted Attraction from Chaos & Crocodiles.  I can't wait til it's October so I can wear it out! :)

Go on over and visit Chaos & Crocodiles' Etsy Shop and like their Facebook Page for updates! 

Let me & Brianna know if you try these Jell-O shots (and actually FOLLOW the recipe)!! We want to know if they're good with the cranberry juice!  Seems like a weird combo - cranberry and cake...??

Have a good weekend lovelies! :) 

Thursday, August 23, 2012

Blue Lemonade and Essie “Armed and Ready”


Hellooooo!  How was everyone’s week?  Glad it’s Friday.  Have I got a yummy (and pretty) drink for you this weekend!  Also, I can tell this Essie is going to be a great Fall color.

You’ll Need:
Vodka
Blue Curacao (I use Mr. Stacks from Total Wine – on sale for $6.99 for 750mL!  That's also where I got my Melon Liqueur & Peach Schnapps for the same price. Had to get stocked up!)
Lemonade (if you haven’t tried the Simply Lemonade yet, I totally recommend it)
Ice

Make it!
Handful of ice in the cup, two parts vodka to one part curacao, fill the rest with lemonade.  IT’S SO PRETTYYYYY!  And tasty!


Essie Armed and Ready with Good as Gold Nail Art
As everyone knows by now, I am obsessed with Essie.  This color adds to my love for the brand.  It’s a dark woodsy olive-ish green with slight gold/bronze/copper shimmer.  Very military-esque.  Lahhh-uhvvvv!  I debated with myself for a while before I actually bought it, but boy I’m glad I finally did.   The first coat was pretty streaky, but by the second coat it looked great.  No streaks or bald spots anywhere. 


Essie Armed and Ready

Essie Armed and Ready

Two coats Essie Armed and Ready 

Two coats Essie Armed and Ready 

While I was picking up my giveaway polishes and goodies, I broke down and bought Essie’s Good as Gold too.  I don’t know why I did, because I think gold nails are tacky, but I guess I can use it for stamping and stuff – or for a little accent like I did here!  I was going to paint little red or neon pink hearts over Armed and Ready, but I decided the color was too dark and the red wouldn’t show very well.  Also, pink would have looked weird over it in my opinion.  So, ding ding ding – gold was the winner. 

Two coats  Essie Armed and Ready
with Essie Good as Gold accent
Two coats  Essie Armed and Ready
with Essie Good as Gold accent and topcoat


I used my dotting tool to make two dots (the top of the heart) and then just connected them with a ‘v’ using the dotting tool as well.  I thought the polish was dry enough after like ten minutes, but of course it wasn’t.  So the heart looks a little globby and lumpy, but ehh its cute anyways. 

Close up: two coats  Essie Armed and Ready
with Essie Good as Gold accent

Bear with me for the next couple weeks while I grow out my nails.  I have kept my nails short for a long time and I finally want to grow them out a bit.  I’m trying to file them in to a square, but the look semi-retarded this week (and probably will for next week too).  I actually broke one in the middle of the week and had to laugh at myself for saying - out loud - AHH I BROKE A NAIL!  lol

Don’t forget to go to my Tipsy Tips * Nails & Cocktails Facebook page and “like” it!  Share it with your friends too!  You know you want to win some free polish and goodies!!


Thursday, August 16, 2012

Glitter Polish Removal!! [Also a Drink and Manicure]


Have you ever seen that e-card that says something about “men will never know the agony of childbirth, cramps, or taking off glitter nail polish”?  Well, we can cross off the polish part now.  They’re still pretty lucky though…

Like most of my horribly terrific (horrifically terrible? terribly horrific?) ideas, I saw this on Pinterest.  I have also seen some of my IG girls post pictures of their “alien fingers”.  I always wanted to know if it worked.  I’ll tell you right now…YES!!  Holy hell! I don’t know why I waited so long to try this!

Take a sheet of tinfoil and divvy it up into ten strips.  Soak a cotton ball in polish remover (I use the non-acetone kind because remover dries out my skin enough as it is) and place it on your nail.  Wrap in tinfoil.  I did one hand at a time because it got hard to maneuver the foil with one hand.  I don’t know, you can try it and see if you’re more skilled than me. 


Sit for five minutes and contemplate life or whatever. 


After five minutes, slide the foil off.  It’s like magic guys!!  It took me ONE COTTON BALL to get the remaining glitter off ALL FIVE of my nails.  So, instead of using 20 cotton balls on one hand like I usually do, I used SIX!!  WHAT?!!  Again.  *~*~*MAGIC*~*~*

Okay, okay.  On to the alcohol.  I’ve been making this drink foreverrrrrrr.  I love it.  Bacardi Big Apple and Ginger Ale.

You’ll Need:
Three ingredients.  Bam.  Done.  Wanna guess what they are??

Bacardi Big Apple
Ginger Ale
Ice

Make It!
Glug, glug, glug - rum, add ice, fill with ginger ale.  Uhhh yum?!


Essie Playa Del Platinum and ZOYA Jancyn

Welp, as you saw on Tuesday’s post, my original manicure for this weekend’s post sucked…hard.  There was no way I was going to leave my nails lookin’ like a hot mess. 

Two coats Essie Playa Del Platinum
Three coats ZOYA Jancyn

I wanted to use the Playa Del Platinum because it’s a super cute nude color.  I work in a law office, so sometimes I feel the need to wear “normal” nail colors.  When I do crazy ones I always get weird looks on the elevator.  Jerks! lol  This polish is really similar to Essie’s Sand Tropez.  So, if you have that color, I wouldn’t bother buying this one also.  Maybe I’ll do a side-by-side comparison one day…I have a lot of colors that are very similar to each other.

Two coats Essie Playa Del Platinum
Three coats ZOYA Jancyn


I did two coats of Essie Playa Del Platinum and three coats of ZOYA Jancyn on the accent nail - no topcoat as usual.  I think I could have done with another coat of the Essie.  There were a few bald spots, but nothing too noticeable.  I don’t know why I keep buying ZOYA.  Well, okay, I do – the colors are soooo pretty!  BUT I honestly can’t stand the polish formula.  AT.  ALL.  With three coats there were still bald spots and you could see the brushstrokes (pictured above).  So annoying!!  However, the ZOYA didn’t chip off at all, while I had a few chips on the Essie.

Have a great weekend y’all! :)  I'm off to Sebastian to visit my grandparents tomorrow :)


Tuesday, August 14, 2012

Holy Nail-FAIL!!


As we all know, not every mani comes out as perfect as we imagined in our heads.  Okay, maybe 95% of them suck hard, and the rest are just ehhh.  But I wanted to share with y’all my biggest nail-fail to date.  Because hey, it happens to all of us (and if you say it doesn’t, stop lying to yourself!).

I’ve been seeing these half moon/reverse French manis on Pinterest for a long time and I reallllllllllllly wanted to try it out.  And clearly just SEEING something on Pinterest makes you an expert on it – no need to read how it’s actually done (Problem #1).  So, I went and bought me some of those paper-hole-punch-reinfrocers from Wal-Mart (I think they were $2.00 for like more than 100 of them – so I can try this plenty more times!!) and sat down to try it out. 

I started out with this pretty neon coral (pix! Vivid Coral from Target – 8 bucks…kind of a waste).  I absolutely love the color, but honestly, the formula SUCKS!  It could very well be that it’s old as dirt because I ALWAYS see the same three bottles on the shelf at Target.  Poo-poo on me for actually buying it I guess.  But it’s still pretty.  Maybe I’ll just reserve it for pedicures.  Anywho, it was goopy and dried before I could even get it to the tips of my nails.  So there was a lot of pulling when I put the second coat on.  I didn’t mind much though, because it was going to be covered up.  I painted this base/“moon” color the day BEFORE I was going to tape them up so the polish wouldn’t peel – lookie there – following my own advice!  Should have stopped then. 
Two coats pix! Vivid Coral
Then the next day, I put the office supplies on my nails.  This was kinda hard.  First, I had the “good” idea to cut them in half to make them last longer…no bueno (Problem #2).  It was harder to place them than with the whole circle.  It was super hard to get the tape in the corners of my nails too, so the whole half-moon was kinda more like a half-moon-with-lines-coming-off-the-sides…you’ll see with the pictures (Problem #3).
The cut in half fail...
A little better...


I picked Essie Playa Del Platinum (on sale at Ulta for $5.99!) to go over the top.  This is a cute color on its own, but a bad idea to put over a neon (Problem #4).  It only took two coats, but it was still pretty streaky and globby.

One coat Essie Playa Del Platinum over two coats pix! Vivid Coral

Two coats Essie Playa Del Platinum over two coats pix! Vivid Coral
By this point I was pissed because I knew the end product was going to suck.  I also have the patience and attention span of a small child, so I didn’t feel like letting two goopy coats completely dry before peeling off the tape.  I sat for about fifteen minutes contemplating what other mani options I had and then decided to reveal the mess.  
ew...just ew.
Close up.  You can see where the edges aren't very clean (goopy polish and my impatience at it's finest)

So there you have it.  Disaster on my fingers.  The thumbs were the worst.  Sadly, I didn’t think to take pictures of them until after I took the polish off.  Oops.  But I’m sure you can just imagine.

This is what I was going for…
NOT MY PICTURE - found on Pinterest
Anywho, I hope you don’t get too discouraged if you have horrific nail-fails like I do.  Just think of something better to do and give it another whack a different week.  See you in a couple days!  (If you’re interested about the Playa Del Platinum, you can wait until Friday because I used it for my re-do manicure.)

Thursday, June 21, 2012

Summer Fun! Mojitos and Cotton Candy Nails


Wheeeee for the weekend!  And its OFFICIALLY summer (not technically here in Florida, cuz let’s be real – it’s ALWAYS summer here).  It was suggested that I post a mojito recipe.  What better time to give it to you than the first weekend of summer!?  Here is my friend’s recipe (thank you, Danny) and my own recipe. 

For Danny’s Cuban Mojito (he uses REAL measurements – WTF?)
You’ll Need:

  •  2 oz. Light Rum (Matusalem Platino)
  • 8-10 Mint Leaves
  • 1 oz. Simple Syrup
  • 1 oz. Fresh Lime Juice – keep the leftover lime for garnish
  • 2 oz. Soda Water
  • Crushed Ice


Make It!

Place mint in a glass along with simple syrup and lime juice, muddle gently.  Slice the remainder of the lime and add along with crushed ice.  Add rum and soda water.  Stir – don’t shake.  Garnish with sprig of mint.  Enjoy.


For My Extra Sweet “Gringa” Mojito
You’ll Need:

  • Light Rum (I like to use Bacardi Limon or Bacardi Dragon Berry)
  • 8-10 Mint Leaves
  • Lime Juice
  • Sprite
  • Ice


Make It!

Pretty much the same as above – Muddle the mint and lime.  Add a few glugs of rum, Sprite and ice.  Stir it up, drink it up, and relax.  I don’t mess around with the garnish of mint and lime.  I usually strain the muddled leaves out anyways since I always seem to forget they’re in the glass and choke on them.  Haha =\

I’ve mentioned before, I LOVE sweet drinks.  So if you’re more traditional, you should most definitely go with Danny’s Mojito.  I was never a fan of soda water, so I always used Sprite instead.  SO GOOD GUYS!  And if you’ve never tried the Bacardi Dragon  Berry…get to a store now and buy some!  It’s strawberry flavored.  Delish.  Adds more flavor to a plain mojito.  It’s also great in Ginger Ale and Coke.  BUT you don’t have to get all fancy with the flavored rum.  Plain Bacardi works perfect too.  Or whatever you want, I don’t care.  Sorry, no picture this time because it only looks like a glass of Sprite - boring.

Fun Cotton Candy Nails

I really wanted to quit boring y’all with my blue polish obsession so I went with something more girly.  I went to the store looking for some nice bright summery colors and stumbled on this gorgeous bubblegum pink Essie that was on sale.  Duh, I had to get it!  Then I was all ohh hey look at this cutie blue too!  I couldn’t help myself and threw in a blue pedi.  So be warned: my gross toes are pictured below!! 

Two coats Essie Cascade Cool; Two coats Sinful Colors Snow Me White
Dotted with Essie Bikini So Teeny and Cool Cascade
I used two coats of Essie Cascade Cool on four nails and two coats of Sinful Colors Snow Me White for my accent nail.  This was a girly enough mani, but I wanted to make it even more fun.  I bought this dotting tool from Sally Beauty a month or so back and was finally brave enough to try it out.  I dotted on (took me like, four tries – SO annoying!  My hands kept shaking) Essie Bikini So Teeny and Cool Cascade in a little sort of half moon shape.  I did the same on my toes but switched the colors as seen below.  It reminded me of cotton candy, hence the post name. :)

I didn't even realize, but the Bikini So Teeny has cute little sparkles in it!

Close up
On the Toes: two coats Bikini So Teeny dotted with Cascade Cool and Snow Me White


Of course, Essie is my favorite brand, so I don’t have any complaints about how the polish went on, no chips, no bubbles, blah blah.  The Sinful Colors got some little cracks, but didn’t start to chip off until Thursday.  I didn’t even put a topcoat on. 


Have a blast this weekend y’all!