Thursday, August 30, 2012

Cucumber Melon Cocktail and Ladylike Nails

Hey guys!  I didn’t float away!!  Pretty close though.  We’re still completely flooded from TS Isaac.  Good luck getting down my road without a lifted truck – and even then you’ll have some problems.  While I was battling boredom through our 11 hour power outage (is that the best you got Isaac?!), I had plenty of time to experiment with my mad (drink) mixing skillz.  I made this one up.  It’s called Cucumber-Melon-Get-You-F*cked-Up-Quick.  And of course, while you’re getting effed up, your nails will at least show you’re semi-ladylike ;)

You’ll Need:
Cucumber Vodka (I use Skinny Girl brand from Total Wine – not sure about the price, probably $18ish for 750mL)
Melon Liqueur
Ice
4-5 Mint Leaves
Sugar (for the rim)
Lemon or Lime Juice

Make It!
Wet the glass’ rim and dip in sugar.  Put the mint leaves (and a pinch of sugar) in a glass and muddle.  Add two shots of cucumber vodka, one shot of melon liqueur, and just a squeeze of lemon or lime juice.  Add ice, stir, draaaaank!  **If you’re in for a long day and DON’T wanna get effed up SO quick, Ginger Ale or Sprite are good mixers – you also won’t need to rim with sugar if you use a mixer.  Sorry, forgot to take a picture ;(

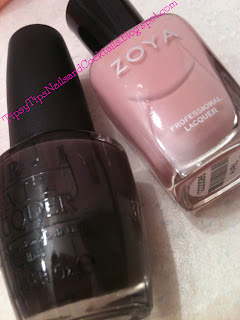
Ladylike Manicure with ZOYA Avril and Bow Stamp with OPI I Brake For Manicures

Two coats ZOYA Avril, 
BM-317 bow stamp with OPI I Brake For Manicures, 
Topcoat
ALERT THE MEDIA!! A ZOYA polish I actually LIKE?!!!!  Oh myyyyyyyy!  THISSSSS!! lol okay, sorry, I’ll calm down. Avril, like most of ZOYA’s polish, is adorable.  I have been wanting to use it for a loooong time, but I have sucky luck with the ZOYAs I have.  Welp, this one is a keeper!!  It’s a really soft nude pink color.  Not really baby pink, but more like light pink with a hint of beige.  Two coats and it was perfect.  No bald spots.  AND it didn't start chipping until Thursday.  There were a few bubbles, but I’ll blame that on myself.

ZOYA Avril
Two coats ZOYA Avril

I ordered the Bundle Monster nail stamps (2011 and 2012 sets – so I got fifty stamp plates with six designs on each … that’s three HUNDRED stamp designs guys, I’m gonna be busy!).  It was so hard to pick which design I wanted.  I tried a few that covered the whole nail and they didn’t come out too well – I need some practice.  So I took a baby step and picked a small design – my cute little bow!  It’s from plate BM-317.
Bundle Monster stamping plate BM-317

I was going to stamp with my black Nicole polish, but I think it went bad or something because it was really transparent, I thought it was more creme, but oh well.  Instead, I tried out one of my OPI’s that I got on sale at Ulta a week or so ago.  It’s called I Brake For Manicures.  I can’t wait to paint all my nails with it for fall.  It’s a maroon/brownish color.  At least it looks maroon over this light polish.  We shall see.  I’m surprised they turned out so good after I had so many Cucumber-Melon-Get-You-F*cked-Up-Quick’s lol :P

OPI I Brake For Manicures
Looks more brown in this picture
OPI I Brake For Manicures 
Kinda looks maroonish here


ZOYA Avril
BM-317 bow stamp with OPI I Brake For Manicures
Topcoat


Have a safe Labor Day weekend y’all!  Don’t forget about my Facebook giveaway!  Im still nowhere near 100 “likes”.  Go to my Tipsy Tips * Nails & Cocktails Facebook page here, like, and tell your friends about it!!

Here’s some Tropical Storm Isaac pics from earlier this week.

Skim boarding in the road Monday (8/27)


Surfing in the road Monday (8/27)

More surfing - same day
Neighbor's SUV in the road/our front yard Tuesday (8/28)

Wednesday (8/29) my daddy taking me to work since my baby Scion tC can't make it down the road


Thursday, August 23, 2012

Blue Lemonade and Essie “Armed and Ready”


Hellooooo!  How was everyone’s week?  Glad it’s Friday.  Have I got a yummy (and pretty) drink for you this weekend!  Also, I can tell this Essie is going to be a great Fall color.

You’ll Need:
Vodka
Blue Curacao (I use Mr. Stacks from Total Wine – on sale for $6.99 for 750mL!  That's also where I got my Melon Liqueur & Peach Schnapps for the same price. Had to get stocked up!)
Lemonade (if you haven’t tried the Simply Lemonade yet, I totally recommend it)
Ice

Make it!
Handful of ice in the cup, two parts vodka to one part curacao, fill the rest with lemonade.  IT’S SO PRETTYYYYY!  And tasty!


Essie Armed and Ready with Good as Gold Nail Art
As everyone knows by now, I am obsessed with Essie.  This color adds to my love for the brand.  It’s a dark woodsy olive-ish green with slight gold/bronze/copper shimmer.  Very military-esque.  Lahhh-uhvvvv!  I debated with myself for a while before I actually bought it, but boy I’m glad I finally did.   The first coat was pretty streaky, but by the second coat it looked great.  No streaks or bald spots anywhere. 


Essie Armed and Ready

Essie Armed and Ready

Two coats Essie Armed and Ready 

Two coats Essie Armed and Ready 

While I was picking up my giveaway polishes and goodies, I broke down and bought Essie’s Good as Gold too.  I don’t know why I did, because I think gold nails are tacky, but I guess I can use it for stamping and stuff – or for a little accent like I did here!  I was going to paint little red or neon pink hearts over Armed and Ready, but I decided the color was too dark and the red wouldn’t show very well.  Also, pink would have looked weird over it in my opinion.  So, ding ding ding – gold was the winner. 

Two coats  Essie Armed and Ready
with Essie Good as Gold accent
Two coats  Essie Armed and Ready
with Essie Good as Gold accent and topcoat


I used my dotting tool to make two dots (the top of the heart) and then just connected them with a ‘v’ using the dotting tool as well.  I thought the polish was dry enough after like ten minutes, but of course it wasn’t.  So the heart looks a little globby and lumpy, but ehh its cute anyways. 

Close up: two coats  Essie Armed and Ready
with Essie Good as Gold accent

Bear with me for the next couple weeks while I grow out my nails.  I have kept my nails short for a long time and I finally want to grow them out a bit.  I’m trying to file them in to a square, but the look semi-retarded this week (and probably will for next week too).  I actually broke one in the middle of the week and had to laugh at myself for saying - out loud - AHH I BROKE A NAIL!  lol

Don’t forget to go to my Tipsy Tips * Nails & Cocktails Facebook page and “like” it!  Share it with your friends too!  You know you want to win some free polish and goodies!!


Thursday, August 16, 2012

Glitter Polish Removal!! [Also a Drink and Manicure]


Have you ever seen that e-card that says something about “men will never know the agony of childbirth, cramps, or taking off glitter nail polish”?  Well, we can cross off the polish part now.  They’re still pretty lucky though…

Like most of my horribly terrific (horrifically terrible? terribly horrific?) ideas, I saw this on Pinterest.  I have also seen some of my IG girls post pictures of their “alien fingers”.  I always wanted to know if it worked.  I’ll tell you right now…YES!!  Holy hell! I don’t know why I waited so long to try this!

Take a sheet of tinfoil and divvy it up into ten strips.  Soak a cotton ball in polish remover (I use the non-acetone kind because remover dries out my skin enough as it is) and place it on your nail.  Wrap in tinfoil.  I did one hand at a time because it got hard to maneuver the foil with one hand.  I don’t know, you can try it and see if you’re more skilled than me. 


Sit for five minutes and contemplate life or whatever. 


After five minutes, slide the foil off.  It’s like magic guys!!  It took me ONE COTTON BALL to get the remaining glitter off ALL FIVE of my nails.  So, instead of using 20 cotton balls on one hand like I usually do, I used SIX!!  WHAT?!!  Again.  *~*~*MAGIC*~*~*

Okay, okay.  On to the alcohol.  I’ve been making this drink foreverrrrrrr.  I love it.  Bacardi Big Apple and Ginger Ale.

You’ll Need:
Three ingredients.  Bam.  Done.  Wanna guess what they are??

Bacardi Big Apple
Ginger Ale
Ice

Make It!
Glug, glug, glug - rum, add ice, fill with ginger ale.  Uhhh yum?!


Essie Playa Del Platinum and ZOYA Jancyn

Welp, as you saw on Tuesday’s post, my original manicure for this weekend’s post sucked…hard.  There was no way I was going to leave my nails lookin’ like a hot mess. 

Two coats Essie Playa Del Platinum
Three coats ZOYA Jancyn

I wanted to use the Playa Del Platinum because it’s a super cute nude color.  I work in a law office, so sometimes I feel the need to wear “normal” nail colors.  When I do crazy ones I always get weird looks on the elevator.  Jerks! lol  This polish is really similar to Essie’s Sand Tropez.  So, if you have that color, I wouldn’t bother buying this one also.  Maybe I’ll do a side-by-side comparison one day…I have a lot of colors that are very similar to each other.

Two coats Essie Playa Del Platinum
Three coats ZOYA Jancyn


I did two coats of Essie Playa Del Platinum and three coats of ZOYA Jancyn on the accent nail - no topcoat as usual.  I think I could have done with another coat of the Essie.  There were a few bald spots, but nothing too noticeable.  I don’t know why I keep buying ZOYA.  Well, okay, I do – the colors are soooo pretty!  BUT I honestly can’t stand the polish formula.  AT.  ALL.  With three coats there were still bald spots and you could see the brushstrokes (pictured above).  So annoying!!  However, the ZOYA didn’t chip off at all, while I had a few chips on the Essie.

Have a great weekend y’all! :)  I'm off to Sebastian to visit my grandparents tomorrow :)


Tuesday, August 14, 2012

Holy Nail-FAIL!!


As we all know, not every mani comes out as perfect as we imagined in our heads.  Okay, maybe 95% of them suck hard, and the rest are just ehhh.  But I wanted to share with y’all my biggest nail-fail to date.  Because hey, it happens to all of us (and if you say it doesn’t, stop lying to yourself!).

I’ve been seeing these half moon/reverse French manis on Pinterest for a long time and I reallllllllllllly wanted to try it out.  And clearly just SEEING something on Pinterest makes you an expert on it – no need to read how it’s actually done (Problem #1).  So, I went and bought me some of those paper-hole-punch-reinfrocers from Wal-Mart (I think they were $2.00 for like more than 100 of them – so I can try this plenty more times!!) and sat down to try it out. 

I started out with this pretty neon coral (pix! Vivid Coral from Target – 8 bucks…kind of a waste).  I absolutely love the color, but honestly, the formula SUCKS!  It could very well be that it’s old as dirt because I ALWAYS see the same three bottles on the shelf at Target.  Poo-poo on me for actually buying it I guess.  But it’s still pretty.  Maybe I’ll just reserve it for pedicures.  Anywho, it was goopy and dried before I could even get it to the tips of my nails.  So there was a lot of pulling when I put the second coat on.  I didn’t mind much though, because it was going to be covered up.  I painted this base/“moon” color the day BEFORE I was going to tape them up so the polish wouldn’t peel – lookie there – following my own advice!  Should have stopped then. 
Two coats pix! Vivid Coral
Then the next day, I put the office supplies on my nails.  This was kinda hard.  First, I had the “good” idea to cut them in half to make them last longer…no bueno (Problem #2).  It was harder to place them than with the whole circle.  It was super hard to get the tape in the corners of my nails too, so the whole half-moon was kinda more like a half-moon-with-lines-coming-off-the-sides…you’ll see with the pictures (Problem #3).
The cut in half fail...
A little better...


I picked Essie Playa Del Platinum (on sale at Ulta for $5.99!) to go over the top.  This is a cute color on its own, but a bad idea to put over a neon (Problem #4).  It only took two coats, but it was still pretty streaky and globby.

One coat Essie Playa Del Platinum over two coats pix! Vivid Coral

Two coats Essie Playa Del Platinum over two coats pix! Vivid Coral
By this point I was pissed because I knew the end product was going to suck.  I also have the patience and attention span of a small child, so I didn’t feel like letting two goopy coats completely dry before peeling off the tape.  I sat for about fifteen minutes contemplating what other mani options I had and then decided to reveal the mess.  
ew...just ew.
Close up.  You can see where the edges aren't very clean (goopy polish and my impatience at it's finest)

So there you have it.  Disaster on my fingers.  The thumbs were the worst.  Sadly, I didn’t think to take pictures of them until after I took the polish off.  Oops.  But I’m sure you can just imagine.

This is what I was going for…
NOT MY PICTURE - found on Pinterest
Anywho, I hope you don’t get too discouraged if you have horrific nail-fails like I do.  Just think of something better to do and give it another whack a different week.  See you in a couple days!  (If you’re interested about the Playa Del Platinum, you can wait until Friday because I used it for my re-do manicure.)

Monday, August 6, 2012

Apple-Tini and Midnight Jewel Heist


Hello Lovelies!  I’m keeping on track with posting!  Two in a row...woohoo! lol For this weekend I have a majorly yummy (and, hi – majorly ESAY) three ingredient apple martini recipe and a pretty dark and sparkly mani.

My mom always says I drank appletinis way before I was drinking age.  I never did, but I finally found a recipe (really, I should say mixer) she swears I tried before. 

Quick funny story before I get to the recipe – I had my first ever martini when I went to Vegas with my aunt for my 21stBirthday.  We were at a really nice sushi restaurant in one of the hotels and I saw a Lychee-tini on the menu.  I LOVE lychees, so I wanted to try it.  I had NO idea a martini was basically straight vodka, so when this beautiful little glass came to the table I had a huge gulp – and proceeded to choke on it.  My aunt almost peed her pants she was laughing so hard.  Needless to say I was a little afraid of martinis for a while after that. :P

You’ll Need:

Vodka
Apple Mixer (I use Master of Mixes - Sour Apple Martini Mixer; found at Total Wine)
Sugar – optional (I use Stirrings - Apple Martini Rimmer; also at Total Wine)
Ice

Make It!


There is a recipe on the mixer bottle, but it’s two shots of vodka to three shots of mixer.  Dip your glass in water then sugar to coat the rim.  Shake the vodka and mixer and ice in a shaker and pour into the glass.  SIP SLOWLY lol ;)

I love sweet drinks, duh, but I personally think appletinis should be sour.  This mix is the perfect balance.  The sugar I got is also a little tangy.  Yummies!  I want another one just thinking about them now!

***drools***

Midnight Jewel Heist Manicure


Two coats Essie No More Film
Two coats Spoiled Jewelry Heist (tips)


I’m using (drum roll please….) Essie No More Film.  <3 <3 <3  Completely love it and I’ve been trying to think up a manicure where I could use it again.  I bought Spoiled Jewelry Heist a while back when I was on that jelly sammich kick (yes, I will eventually do one of those).  I was originally going to use a pinkish base with it, but I wanted to use No More Film so that’s how this came about. 


You already know how No More Film is from a few posts back.  Went on almost perfect in one coat – I did two just cuz that’s what I always do.  I actually waited a whole day for it to dry before I put the glitter on so it wouldn’t be SO goopy and take thirty million years to completely dry.  Jewelry Heist is such a pretty glitter.  It has tons of hex (I know what this means now!! lol) glitters in gold and light pink, small hex in silver and orange, and tiny square in blue, green, orange and silver.  Every time I would look at it for the first few days I would find a different color. 


As much as I like both of these polishes separately, I’m not sure they make the BEST combo.  It’s kind of hard to see the glitter because No More Film is so dark.  Also, Jewelry Heist is really base-y.  The clear coat is so thick that there is a clear line where I painted it on the bottom half of my nails.  It was difficult to transfer the glitter from the brush to my nail too.  Nonetheless, I’m pretty happy with how they came out.  Anything with this Essie color looks awesome-sauce J

Blurred for effect 

Blurred for effect


Have a great weekend! :)

Thursday, August 2, 2012

Spiked Pineapple OJ and a Glam-icure


Welcome back!  Sorry I’ve been majorly slacking!!  This week’s drink is a delicious and refreshing thirst-quencher!!  Perfect for this ridiculous heat wave we all seem to be going through – blechhh! 

You’ll Need:

OJ
Parrot Bay Pineapple Rum
Ice

Make It!

Glass, two shots of rum, add ice, top with OJ.  Easy-peasy!  :)  Be careful, these sneak up and slam ya.  I totally love them though!  They’re really fruity (of course) and so so good!

Glam-icure with ZOYA Jolene and OPI Metallic 4 Life

Two Coats ZOYA Jolene and OPI Metallic 4 Life
Can I just say – this is my new favorite pink!  SOOO adorable.  It’s not hot pink, not neon, not light pink, but a weird mix of the three.  I’m kinda disappointed with it though.  ZOYA doesn’t seem to like to stick on my nails.  I painted them Sunday, and by Tuesday they were all chippy and worn off on the tips.  I also noticed some “bald” spots on my thumb (after two coats). 

I’ve had my eye on this OPI in Ulta for, like, four months – at least!  I finally broke down and got it.  As much as I hate to admit, it’s from their Nikki Minaj collection.  I don’t know why, but I just can’t stand her and hate that I like the polish so much.  Oh well. 


How-To:

This is glam and so simple!  Three easy steps y’all!

Paint two coats of the base color.  In this case, ZOYA’s Jolene.  Let it dry COMPLETELY before the next step!!
Tape off the corner of your accent nails.  I used Frog Tape – the kind painters use on walls, but you can totally use regular tape. 
Paint the “glam” accent color on (OPI’s Metallic 4 Life).  I used two coats to make it darker since it’s kinda a jelly polish.  Let it dry a little before peeling the tape off for a cleaner line. 

Frog Tape on the Accent Nail

As you see, I’m impatient and didn’t let the base dry all the way so some of the base AND accent peeled off a little when I took the tape off.  I would even suggest letting the base be on your nails for a whole day before putting the accent on.  Then you know its REALLLLLY dry lol


Okay lovies! again I apologize for slacking sooooo much, but hopefully I'm back on track now!